 In this post we provide a step by step guide detailing how to take videos from your iPhone, iPad or iPod and convert them into a format which you can then burn onto a DVD using standard Mac software.
Introduction
With iOS devices becoming increasingly popular and their cameras capable of recording HD video, more of us are capturing important life moments on our iPhones and iPads. But how can you ensure these memories are not lost, and that you can easily share them with friends and family ? One option is to save your photos and videos to DVD.
This guide will step you through the simple process of converting and transferring your video from your iOS device to a DVD disc. We will use Zamzar to upload and convert your video, and free iDVD software from Mac OSX to burn the files to DVD.
1 – Convert your video
Go to https://www.zamzar.com your iPad or iPhone and when prompted select ‘Choose Existing’ to grab a video from your photo library.
NOTE: Your device must be running a minimum of iOS 6 for Zamzar to be able to detect these files correctly.

Now choose your video file:

In the drop down list in “Step 2” select MP4 as your target format. Then enter your email address in “Step 3” and click “Convert”. Please be aware that if you are not connected to WiFi your network provider may charge you for the data used in uploading the file. You will receive an email from Zamzar when your converted file is ready to be downloaded.
2 – Download your file
From your computer, open the email from Zamzar and download your converted file:

Ensure that you save the file in your ‘Movies’ folder so that iDVD will be able to find it:

3 – Open your video in iDVD
Go to the ‘Applications’ menu in Finder and select iDVD:

Once open choose ‘Create a New Project’ and give it a meaningful name. Make sure to select Widescreen as the aspect ratio (for more on aspect ratio see the useful links at the end of the article) as you will need this to be able to make use of the most recent themes.


4 – Personalise your DVD
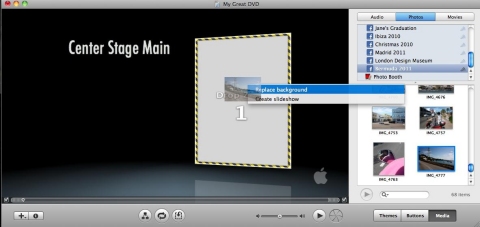
The iDVD menu will then appear. Scroll through the Themes to find one that suits your movie. In this example the ‘Center Stage’ theme has been selected.

Note the ‘Drop Zone 1’ that has appeared in the screenshot above. This allows you to personalise the DVD menu. You can add video or still images to this section. We will add a photo by clicking on the ‘Media’ button towards the bottom right and then choosing ‘Photos’ from the menu that appears. Browse to an image and then drag and drop into the ‘Drop Zone 1’ area:
5 – Add your video
Next click on the ‘+’ symbol in the bottom left of the screen, and then choose ‘Add Movie’:

A box will then appear with the text ‘Add Movie Here’ on the main window and the movies sub menu will automatically appear in the right hand side. Browse to your movie and then drag and drop onto the button.

The name will automatically change to the file name of your movie. You can amend this to something more suitable. This text will then be a button within your DVD menu that you can select when playing your DVD, just like a professional movie:

By clicking on the play icon in the bottom menu you can preview how your DVD will play. You can also try clicking the button you have created:

6 – Burn your DVD
Once you are happy with your movie you can now burn it to DVD. First insert the blank DVD into the drive. Then click on the icon next to the preview icon to burn the DVD.

The burning process should begin automatically. The time it takes to burn the DVD will depend on the size of the movie content, and the speed of your DVD drive

Once complete insert your DVD into a DVD player and you enjoy watching your movie !
Happy Converting (and burning) !
The Zamzar Team.
![]()


